Today, Miami Cloud helps corporate professionals over 40 stay off the layoff list, and get back fast if they end up on it. Start with the free Career Defense Playbook, or get the free Career Inventory Worksheet.
Unknown Unknowns: The Real Power Of The Rumsfeld Matrix
You may worry about risks that just seem to appear out of nowhere, leaving your team scrambling. Unknown Unknows: The Real Power Of The Rumsfeld Matrix shows how most leaders miss the biggest dangers because they focus only on what they already know or can guess.
This blog breaks down the Rumsfeld matrix and explains why spotting unknown unknowns is key for better decision-making, risk management, and smarter innovation in 2025. Discover a tool that helps you prepare your IT projects for anything; even surprises no one sees coming.
Understanding the Rumsfeld Matrix
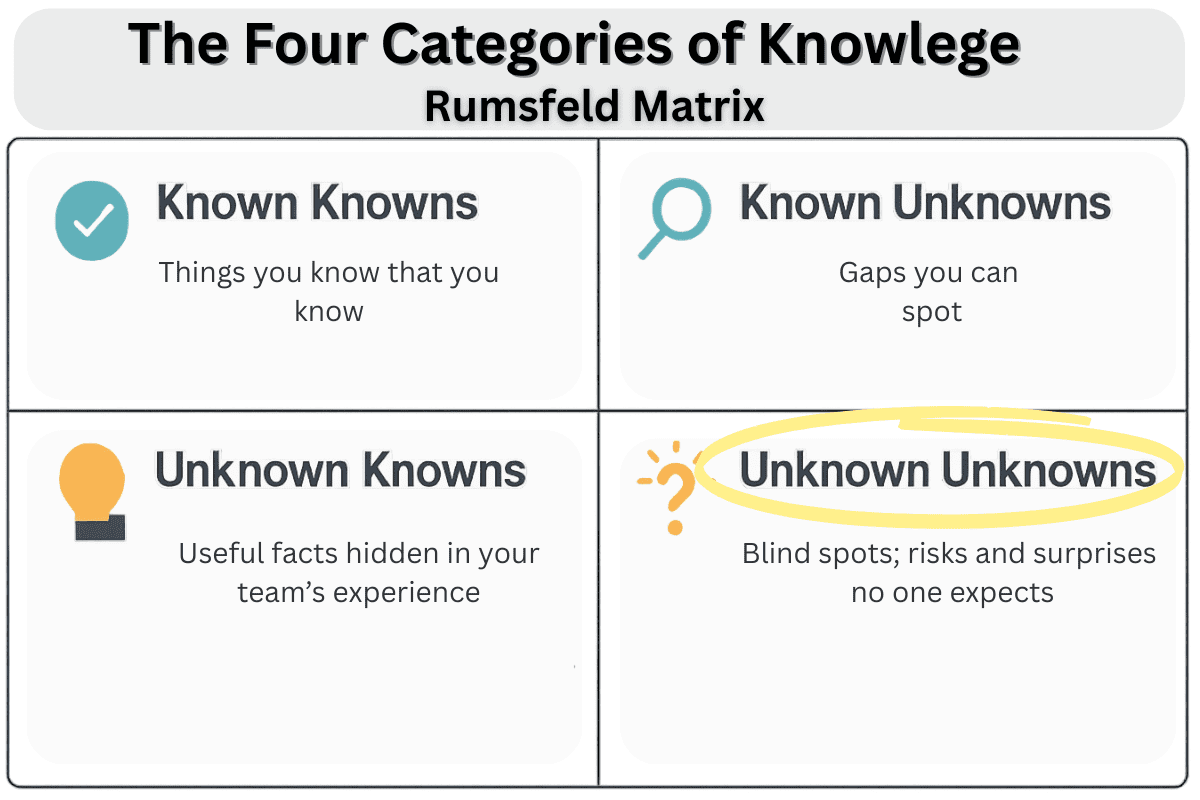
The Rumsfeld Matrix helps leaders think clearly about knowledge. It shows four types: known knowns, known unknowns, unknown knowns, and unknown unknowns. Each type gives a different view on what we know and don’t know.
This table breaks it down simply for better understanding….
The Four Categories of Knowledge
– Known Knowns: Things you know that you know, like basic system uptime or user counts.
– Known Unknowns: Gaps you can spot, such as missing disaster recovery plans or untested failovers.
– Unknown Knowns: Useful facts hidden in your team’s experience; think of missed lessons from an old project or overlooked code in legacy systems.
– Unknown Unknowns: Blind spots; risks and surprises no one expects, like zero-day vulnerabilities or a sudden AI-driven shift.
There are known knowns; there are things we know we know… but there are also unknown unknowns. — Donald Rumsfeld
Project managers use frameworks like the Johari Window and risk assessment tools to spot each category. To cover all bases, leaders blend scenario planning with predictive analytics and machine learning models.
Facing unknown-unknowns protects tech teams from shocks like the BP oil spill, generative AI booms, or cyberattacks hiding in plain sight.
Rumsfeld Matrix article briefing
This article breaks down the Rumsfeld Matrix, a decision-making framework made famous by Secretary of Defense Donald Rumsfeld in 2002. It also shows how “Black Swan events” (see below) like the 2008 financial crash, COVID-19, and generative artificial intelligence fit as true unknown unknowns; events no weather forecast or risk register could have flagged early.
You will see practical ways to spot weak signals and build resilience so your team can make better choices even when data is missing or the future looks uncertain.
The Power of Unknown Unknowns
The power of unknown unknowns lies in their hidden nature. These gaps can shape how we plan, adapt, and respond. Blind spots might lead to missed opportunities or poor choices. Traditional tools like SWOT analysis often can’t catch these surprises.
Leaders who ignore them risk being caught off guard when it matters most….
Why this quadrant matters more than the rest.
Unknown unknowns catch even experts off guard. These are risks no one expects, like the tsunami that triggered Fukushima Daiichi’s nuclear disaster in 2011 or the COVID pandemic in 2020.
No risk register or SWOT chart had these events listed. Decision-makers cannot predict such hazards, yet their effects can change everything for IT delivery teams and tech firms overnight.
Blind spots hide major threats but also big opportunities for creativity and innovation. Artificial intelligence helps spot patterns inside known unknowns and unknown knowns, but true black swans remain hidden until they strike.
Smart leaders use scenario planning and ground penetrating radar tools to prepare action plans—even with limited information—so they’re ready to face wave after wave of surprises.
“There are things we do not know we do not know.” — Donald Rumsfeld
How blind spots shape strategy, innovation, and crisis response.
Blind spots in knowledge can make or break your decision making process. Leaders often miss the Unknown Unknowns, which hide real risks and new opportunities. In 2008, for example, banks trusted efficient market theory and missed signals that led to financial collapse.
Relying only on tools like SWOT or risk registers leaves teams open to surprises that shake strategy, slow innovation, or spark crisis.
Natural disasters like Hurricane Katrina and events such as Deepwater Horizon show what happens when organizations ignore uncertainties or base rate neglect. Teams must search for hidden skills, the unknown knowns, within their ranks to boost productivity during emergencies.
Using big data, AI-driven research, and scenario planning helps find these blind spots faster than before. The Rumsfeld Matrix encourages leaders to ask harder questions so they can prepare better for tsunamis of change instead of relying on hindsight after a catastrophe hits.
Where traditional tools (SWOT, risk registers) fall short.
Classic tools like SWOT analysis and risk registers help spot threats that you can see coming. They do well with known risks, such as project delays, tech failures, or leaks in Google Drive security.
Yet, these methods miss the danger of unknown-unknowns—the surprises you cannot list or even imagine.
As early as 1982, “unknown unknowns” explained disasters like metal fatigue in the de Havilland Comet crash. The U.S. military and aerospace teams used “unknown-unknownss” to describe what they could not forecast during missions or health crises.
Regular checklists look backward at past issues rather than forward into hidden corners of uncertainty. These limits mean leaders may fall into traps related to privacy breaches, sudden cyber-attacks, or Black Swan events, such as the 2008 financial crisis or a generative AI boom, which escape all risk register lines.
Relying only on familiar tools weakens your ability to react fast when things move outside predictions set by theory of knowledge models. Real wisdom for IT Delivery Managers comes from knowing there are always new reasons for concern; even if no one has seen them coming yet.
Black Swans: The Extreme Unknown Unknowns
Black Swans are rare events that come with big surprises. They can change everything, like 9/11 or the COVID pandemic. These events show us just how unpredictable life can be and why we must be ready for anything.
Understanding Black Swans helps leaders think about risks in new ways. It’s all part of tackling what we don’t see coming… and preparing ourselves to act fast when it matters most.
What Are Black Swans? (Taleb’s definition)
Nassim Taleb defines black swans as rare events that are hard to predict and have huge impacts. These can shake up technology, business, or even whole societies in ways no one saw coming.
Some examples include the 9/11 attacks, the 2008 financial crash, the COVID-19 pandemic, and the sudden rise of generative AI. Black swans sit in the unknown unknowns section of the Rumsfeld Matrix.
I know that I know nothing. — Socrates
Black swan events often catch leaders off guard because they do not appear on most risk registers or SWOT analyses. They show why overconfidence in forecasts can backfire. Spotting early signals is tough but matters for strategy and flood-control planning alike.
Understanding these extreme unknowns helps IT delivery managers see where traditional tools fail and why flexible thinking aids in decision-making during catastrophes like earthquakes or cyber threats never seen before.
Examples of Black Swan Events (9/11, 2008 crash, COVID, generative AI boom)
The September 11 attacks in 2001 shocked the world and changed how governments handle security. The Commission to Assess the Ballistic Missile Threat never predicted such an event.
In 2008, a global financial crash hit fast and hard. Banks failed, jobs vanished, and risk models proved useless. Forecasting tools like risk registers missed these huge unknowns.
In early 2020, the COVID-19 pandemic spread quickly across countries. Leaders everywhere faced new threats they could not plan for using normal simulations or hurricane center warnings.
Most organizations had no playbook for daily remote work or massive supply chain breakdowns. Now, generative AI is booming with little warning; experts did not foresee its speed or impact on work and society.
Each of these events shows why leaders must accept there are unknown unknowns—shocks that reshape norms overnight—making frameworks like the Rumsfeld Matrix vital for IT delivery managers who manage risk with limited information and evolving technology like e-mail systems and cloud platforms.
Why Black Swans Matter in Risk and Strategy
Black Swan events, as described by Nassim Nicholas Taleb, change everything fast. These rare shocks—like 9/11, the 2008 financial crash, COVID-19, or the sudden rise of generative AI—are not on your risk register.
They even slip past a SWOT analysis or traditional risk frameworks used in IT delivery. Black Swans show up where you have Unknown Unknowns on the Rumsfeld Matrix.
Ignoring these extreme surprises can wreck plans and budgets overnight. Some leaders thought they knew all threats before Abu Ghraib or the Ballistic Missile Commission report but got blindsided anyway.
Even experts at places like the National Hurricane Center must admit that some storms break every rulebook. Black Swans force teams to rethink controls and fallback strategies because regular playbooks often fail big time.
Smart IT managers use this insight to build flexible systems and keep their eyes open for odd signals—indicators that something unexpected is brewing. That mindset is real leverage against disaster…and it keeps strategy sharp in a world filled with both known and unknown risks.
How Black Swans Fit Into the Rumsfeld Matrix (subset of unknown unknowns, not “vs.”)
Black Swan events sit deep inside the “unknown unknowns” box of the Rumsfeld Matrix. Nassim Nicholas Taleb made the Black Swan theory famous. He explained that some shocks, like 9/11, the 2008 market crash, COVID-19, and even generative AI in the early 2020s, are both rare and impossible to see coming until after they happen.
You cannot list these events as risks on a standard SWOT analysis or risk register. They do not compete with other unknowns; instead, they form an extreme subset.
Industry leaders in aerospace and defense have used terms like “unknown-unknowns” since the late 1960s for such surprises. All Black Swans are “unknown unknowns,” but not every “unknown unknown” becomes a Black Swan event.
These moments reshape markets fast and can expose limits in current knowledge or models—a lesson seen during crises like Abu Ghraib or sudden shifts in cybersecurity threats from zero-day vulnerabilities.
The greatest danger is not what we know—or what we don’t—but what we don’t know we don’t know.
Being Ready for Anything, Not Everything
Being prepared for the unexpected is key. You can’t predict every challenge, but you can set up safety nets that help you respond quickly and effectively. Use early warning signals to stay alert and take action when needed…
It’s about being wise with your strategy, even if some unknowns lurk ahead.
Why a Starting Point Matters in Unknown Unknowns
A starting point is key in facing Unknown Unknowns. It builds a strong base for understanding risks and gaps in knowledge. Identifying your first thoughts helps spot what you don’t know yet.
You can then recognize potential unknown threats.
This approach encourages clear decision-making. Knowing where to begin reveals areas needing attention. A solid foundation allows better use of AI tools with the Rumsfeld Matrix, making it easier to handle challenges as they arise.
Understanding your initial thoughts also highlights biases that could block insight into those unknowns.
High-Level Contingency as a Safety Net Using Markers as Early Warning Signals (indicators & warnings, PMI triggers)
High-level contingency acts as a safety net. It helps teams prepare for unknowns that can arise in projects. Early warning signals are key. These indicators alert managers to potential problems before they happen.
Using tools like PMI triggers can enhance readiness. They provide data points showing where issues might emerge. This allows IT Delivery Managers to act swiftly instead of freezing up when faced with uncertainties.
By spotting these markers, teams can shift from paralysis to action, making strategic decisions with more confidence and clarity in an unpredictable environment.
From Paralysis to Action When Categories Converge
Blind spots can trap teams in indecision. Leaders need to identify what they know and what they don’t know. The Rumsfeld Matrix helps break down this process into clear categories.
It allows IT Delivery Managers to see where gaps exist in their knowledge.
Using tools like PMI triggers and ground-penetrating radar can guide teams toward action. These methods show early warning signals for emerging risks, turning uncertainty into strategy.
By regularly reviewing assumptions, managers can adapt quickly, avoiding paralysis by analysis. Focusing on unknown knowns reduces surprises and drives innovation forward.
Applying the Rumsfeld Matrix in Today’s World
The Rumsfeld Matrix aids IT Delivery Managers in understanding risk more effectively. It illustrates four types of knowledge: Known Knowns, Known Unknowns, Unknown Knowns, and Unknown Unknowns.
With tools like strategic foresight and scenario planning, managers can explore BANI and VUCA frameworks. These assist teams in preparing for change in their projects.
Cybersecurity is essential today. Zero-day vulnerabilities are subtle threats that can cause significant harm. AI risks also increase as machine behaviors become more intricate; this adds to the unknowns we face.
Communicating uncertainty with executives is crucial to handling these challenges effectively. The next section will examine how being prepared for anything—while not predicting everything—can improve project outcomes.
Strategic foresight helps teams prepare for the unknown. BANI and VUCA are frameworks that guide this process. They offer structured ways to think about risks and uncertainties. BANI stands for Brittle, Anxious, Nonlinear, and Incomprehensible.
VUCA means Volatile, Uncertain, Complex, and Ambiguous.
Using horizon scanning is key to identifying future trends. This lets IT Delivery Managers spot changes before they happen. It gives them a chance to adapt strategies accordingly. AI tools can also play a role by analyzing large data sets for insights but cannot replace human creativity or intuition in decision-making processes.
Cybersecurity & zero-day vulnerabilities
Cybersecurity faces many challenges today, especially with zero-day vulnerabilities. These are flaws that hackers exploit before anyone knows they exist. Rumsfeld’s framework helps in understanding these unknowns better.
Cybersecurity managers must classify threats as known or unknown to protect their systems effectively.
AI tools can spot patterns in both kinds of vulnerabilities. They enhance our ability to detect risks we might not see on our own. Yet, human intuition remains vital; machines can’t replace it completely.
Balancing AI’s power with human oversight is key for strong cybersecurity strategies and risk management. Without this balance, managing threats will become even harder as technology continues evolving rapidly.
AI risk & emergent behaviors
AI has its strengths, but it also has limits. It can help find Known Unknowns and Unknown Knowns using data analysis. This is crucial for spotting potential risks. Still, AI can’t predict Unknown Unknowns.
These are surprises that catch everyone off guard.
Emergent behaviors can add to the risk. They arise when systems react in unexpected ways. A good example is how financial markets behave unpredictably due to unseen factors; usually, AI struggles here too.
Relying only on AI could lead to blind spots in decision-making, as it lacks human intuition and ethical judgment. IT leaders need to be aware of these risks while planning their strategy and responses effectively for future scenarios involving Black Swans or other unknown events.
Communicating uncertainty to executives
Understanding uncertainty is key for IT leaders. The Rumsfeld Matrix helps explain what we know and what we don’t. This framework is useful when sharing the limits of knowledge with executives.
It reflects the need for transparency, as noted in Rumsfeld’s memoir, “Known and Unknown.”.
In high-stakes settings, it’s vital to communicate risks clearly. Traditional tools like SWOT analysis may not capture all threats, especially in cybersecurity where zero-day vulnerabilities lurk unnoticed by both attackers and defenders.
By using the matrix to highlight unknowns, leaders can guide strategies effectively during crises or change.
Conclusion
Unknown unknowns hold real power. They help leaders spot risks that others miss. The Rumsfeld Matrix is a tool for this challenge. It guides us in preparing for the unpredictable. Embracing these ideas can spark innovation and improve responses to crises.
Stay alert, stay ready; you’ll be better equipped for what comes next.
If you liked this article, remember to subscribe to miamicloud.com/. Connect. Learn. Innovate.
Today, Miami Cloud helps corporate professionals over 40 stay off the layoff list, and get back fast if they end up on it. Start with the free Career Defense Playbook, or get the free Career Inventory Worksheet.
Pro Tips To Use Plan Do Check Adjust In Scrum
Do you find it hard to keep your Scrum team focused and improving each sprint? Agile methods like Scrum rely heavily on continuous improvement through the Plan-Do-Check-Adjust (PDCA) cycle, a method made popular by Dr. W. Edwards Deming in the 1950s. This post will share easy-to-follow pro tips to use Plan Do Check Adjust in Scrum, helping your team set clear sprint goals, work well together, and learn from retrospectives.
Keep reading for practical advice that brings real results.
Key Takeaways
Scrum teams use the PDCA cycle (Plan-Do-Check-Adjust) for steady improvement—set clear sprint goals during planning, execute tasks in daily stand-ups (“do”), check results through sprint reviews, and adjust actions from retrospectives.
Regular stakeholder feedback is key to improving sprints; gather insights early through review meetings, quick surveys (5–7 questions), short discussions on platforms like Slack or Microsoft Teams, and visual tools such as Jira or Trello to easily track comments.
Daily stand-up meetings should last about 15 minutes; team members briefly discuss yesterday’s progress, today’s plans, and any issues. Google’s Project Aristotle study (2019) found open communication boosts teamwork and productivity significantly.
Always define action points clearly after each retrospective (such as missed deadlines); assign them directly to individuals using simple project apps like Jira or Asana with specific priority ranks. Small incremental changes prevent bigger issues later.
The four-phase PDCA method was first developed by statistician Walter Shewhart in the 1920s as a three-stage model (Specify–Produce–Inspect). Later modified into today’s Plan–Do–Check–Adjust form by Dr. W. Edwards Deming in the 1950s for easier tracking of real improvements rather than just analysis alone.
Understanding the Plan-Do-Check-Adjust (PDCA) Cycle in Scrum
While the PDCA cycle isn’t part of the official Scrum Guide, it aligns well with Scrum’s principles of continuous improvement. Many Agile teams use it as a helpful framework to enhance their sprint process.
The PDCA cycle follows a simple pattern—plan tasks, carry them out, check results, and make changes—to improve Scrum teamwork step by step. This iterative process fits well with Scrum principles like sprint planning, team collaboration, and regular retrospectives.
Today, Miami Cloud helps corporate professionals over 40 stay off the layoff list, and get back fast if they end up on it. Start with the free Career Defense Playbook, or get the free Career Inventory Worksheet.
Step-by-Step Guide to Deploying the Palo Alto Networks VM-Series Firewall in AWS
Setting up a firewall in AWS (Amazon Web Services) can feel like a big challenge. One interesting fact is that deploying a VM-Series Firewall significantly boosts your network’s security on AWS.
Our deployment guide walks you through every step of this process, making it easier than ever to secure your cloud environment. Ready to get started?.
Key Takeaways
Setting up the VM – Series Firewall in AWS boosts network security by integrating with services like Gateway Load Balancer, AWS Cloud WAN, and VPC Endpoint associations. This setup ensures scalable and secure connectivity.
Deploying this firewall involves selecting the right model from the AWS Marketplace, configuring settings through its interface, and setting up security policies for threat prevention. These steps help create a robust defense against cyber threats.
The Palo Alto Firewall offers advanced features like network inspection, threat prevention, and dynamic address groups in AWS. It’s cost-effective due to auto-scaling capabilities that adjust resources based on demand.
Challenges such as licensing issues, performance tuning, and troubleshooting can arise when deploying Palo Alto Firewalls in AWS. Overcoming these requires understanding traffic demands, adjusting settings accordingly, and utilizing detailed logs for pinpointing issues.
Utilizing VM – Series with AWS Gateway Load Balancer enhances security by allowing traffic flow through firewalls before reaching applications. This integration supports scalability while maintaining strong defenses against threats across both IPv4 and IPv6 addresses.
Understanding the VM-Series Firewall
Shifting focus to the VM-Series firewall, let’s dive into what makes it a powerhouse in cloud security. The VM-Series is designed for the AWS environment, offering capabilities that extend beyond traditional firewalls.
It integrates smoothly with Gateway Load Balancer, ensuring not just enhanced security but also scalability across your network. This means you can grow your setup without worrying about increased risk.
The firewall supports secure connectivity through integration with AWS Cloud WAN and VPC Endpoint associations for protected communication within AWS. Overlay routing capability optimizes network traffic, making sure performance stays top-notch even under load.
Think of the VM-Series as not just a barrier against threats but as a bridge to efficient, scalable infrastructure in the cloud.
Steps to Deploy the VM-Series Firewall in AWS
Deploying the VM-Series Firewall on AWS can significantly boost your network’s security. It’s a step-by-step journey, ensuring every part of your cloud environment is shielded from threats.
Preparation for deployment
Before launching the VM-Series Firewall in your AWS environment, you need to tackle a few crucial steps. Start by setting up your AWS environment correctly. This includes selecting the right network and creating security groups that align with your organization’s policies.
Double-checking these configurations ensures a smooth integration with other native AWS services.
Gather all necessary information about VMware NSX-V, as this will play a significant role if integrating with other cloud platforms or environments beyond AWS. Planning is key—consider how multi-NSX Manager support might benefit your deployment strategy, especially for managing multiple instances or ensuring high availability across different zones.
This preparation phase is not just about ticking off items on a checklist; it’s about laying down the groundwork for a secure and robust firewall setup that can scale according to business needs while protecting against threats effectively.
Launching the VM-Series Firewall on AWS
First, select the right VM-Series model for your needs. You’ll find different options in the AWS Marketplace—each designed to match specific security and network demands. Look closely at each model’s features and throughput capacities.
This step is crucial for tailoring your firewall to handle the expected traffic flow smoothly.
Next, navigate through the AWS Marketplace to launch your chosen VM-Series Firewall. It involves a few clicks and filling out some basic information about your deployment preferences—a simple process made easier by AWS’s user-friendly interface.
Ensure you set up proper IP addressing and select an appropriate network mask that aligns with your organization’s infrastructure requirements. This stage sets the foundation for a secure and efficient network environment on AWS, paving the way for advanced threat prevention measures ahead.
Setting up the VM-Series Firewall on AWS
After launching the VM-Series Firewall on AWS, it’s time to get everything set up and running smoothly. Accessing the firewall interface is your first step. Here, you’ll enter your credentials and begin configuring basic settings.
This includes setting up a default route and securing your networks with security group rules tailored to your needs. These steps ensure that only authorized traffic flows through the firewall, keeping malicious threats at bay.
Next, adjust network configurations to fit your environment. Define security policies that align with best practices for network safety. Implement threat prevention mechanisms by activating features designed to block harmful malware and spyware from reaching your internal networks.
By taking these actions, you fortify your AWS environment against possible intrusions or attacks, making it a safer place for all of your applications and data to reside.
Quick Reference Guide: Deploying Palo Alto Firewall on AWS
Create Key Pairs
Log in to AWS account.
Navigate to Network Security -> Key Pairs.
Create a new key pair, name it, and save it as a .ppk file using PuTTY Key Generator.
Prepare the VPC
Delete default subnets in AWS VPC.
Create four new subnets: Management, Inside, Outside, and DMZ, ensuring IP addresses are within the VPC range.
Select the Palo Alto Image
Log in to AWS, go to Services -> EC2.
Choose Amazon Marketplace, search for Palo Alto, and select VM-Series Next Generation Firewall Bundle 2.
Create an Instance
Launch a new EC2 instance, selecting the Palo Alto image.
Choose instance type M3 Extra Large.
Configure instance details, selecting Management for the subnet and auto-assigning a Public IP.
Add storage, selecting General Purpose SSD (GP2) volume type.
Configure Security Group with unrestricted access and review settings before launching.
Select the previously created key pair and launch the instance.
Configure the VPC
Go to VPC dashboard, select Management subnet, and associate it with the Outside Routing table for Internet access.
Assign an IP Address to the Instance
In EC2, select the instance and navigate to Network & Security -> Elastic IPs.
Allocate a new address, associate it with the instance, and select an IP address to assign.
Test the Configuration
Connect to the management interface using the AWS Public IP address through a PuTTY session or a web browser.
Features of Palo Alto Firewall in AWS
Palo Alto Firewall in AWS offers cutting-edge security that keeps your networks safe from threats—discover how it transforms cloud security for the better.
Network inspection and threat prevention
Network inspection and threat prevention are key to safeguarding your AWS environment. The VM-Series Firewall from Palo Alto Networks is designed to do just that. It scans all incoming and outgoing traffic for threats, blocks harmful activities, and prevents unauthorized access.
This firewall acts like a vigilant guard, checking every packet of data against known vulnerabilities and malicious code.
Setting up the VM-Series on AWS means you’re not only protecting your EC2 instances but also enhancing security with dynamic address groups. These tools work together to identify and stop attacks before they reach your network.
With features tailored for auto-scaling and integration with Amazon ELB services, the system adapts to traffic changes—ensuring robust security without compromise. Trust in this setup gives peace of mind; knowing your cloud infrastructure stays secure against ever-evolving cyber threats.
Security controls augmentation
You can beef up your AWS environment with dynamic address groups and security policy extensions. These tools help you stay ahead by automatically adjusting policies as network traffic changes.
Think of them as smart guards that adapt in real-time, keeping unwanted visitors out without you having to lift a finger.
Integrating the VM-Series Firewall with load balancers and WAN services ramps up your defense game even more. It’s like adding an extra layer of armor around your cloud fortress, making sure every bit of data passing through gets scrutinized for threats.
This setup not only tightens security but also keeps things running smoothly, ensuring your AWS environment is both safe and efficient.
Cost-effectiveness and scale
Deploying the VM-Series Firewall on AWS offers a smart way to manage your budget while growing your security infrastructure. The use of cloud monitoring services and dynamic scaling with auto-scaling templates make it an efficient choice for businesses of all sizes.
These tools automatically adjust resources based on demand, ensuring you only pay for what you need. This approach maximizes your investment, making every dollar count towards securing your network.
Scaling up doesn’t have to mean ramping up costs. With the VM-Series Firewall, leveraging features like encryption of EBS volumes and using dynamic address groups helps in securing instances within VPCs without a hefty price tag.
As traffic grows, the solution scales seamlessly—thanks to high availability and load balancing techniques—without compromising performance or breaking the bank. This blend of flexibility and cost control makes it an appealing option for junior network engineers looking to optimize their organization’s cloud security posture efficiently.
Implementing Next-Generation Threat Prevention with AWS Gateway Load Balancer and VM-Series Firewalls
Leveraging AWS Gateway Load Balancer with VM-Series Firewalls transforms your network’s security. It steps up the game in blocking threats before they reach your applications, ensuring peace of mind and ultra-secure operations.
Set-up process
Setting up the VM-Series firewall on AWS is a crucial step towards safeguarding your network. First, ensure you have prepared your AWS environment correctly. It involves configuring service definitions and creating template stacks along with device groups in Panorama.
This preparation enables a smooth integration process. Then, focus on enabling VM-Series integration with the AWS Gateway Load Balancer. This step is essential for setting up auto-scaling groups and ensuring high availability for your VM-Series firewall.
Integrating CloudWatch monitoring comes next, enhancing visibility across your network’s activities. Activate Auto Scaling with Amazon ELB to manage traffic efficiently and ensure your setup scales as needed without manual intervention.
Connect the VM-Series firewall seamlessly with AWS Cloud WAN and Outposts to extend its capabilities further into the cloud infrastructure, making sure you’re fully leveraging the cloud-native services provided by AWS to bolster security measures and streamline operations across platforms.
Challenges of Deploying Palo Alto Firewall in AWS and overcoming them
Deploying Palo Alto Firewall in AWS can be tough. You might face issues with licensing, performance tuning, and troubleshooting. It’s normal to hit bumps along the way. The good news is, you’re not alone.
Many have navigated these waters before and found solutions. For licensing, make sure you understand the options – BYOL or pay-as-you-go are both viable but have different impacts on cost and flexibility.
For performance tuning, start by identifying your traffic patterns and demands. Then adjust your VM-Series firewall settings to meet these needs without overspending resources. Troubleshooting can get tricky, especially when dealing with complex network configurations or integrating with AWS services like CloudWatch for monitoring.
But remember, detailed logs are your best friend here—they’ll guide you to pinpoint issues quickly. With persistence and the right approach, these challenges become stepping stones rather than roadblocks.
Integrating VM-Series Firewalls with AWS Infrastructure
You can integrate VM-Series with Gateway Load Balancer in AWS by setting up the load balancer as a target. This process allows traffic to flow through your firewall for enhanced security.
For deploying VM-Series Firewalls as GlobalProtect Gateways, ensure your AWS environment is properly configured. Remember, securing your network involves understanding these configurations and applying them correctly.
Associating a VPC Endpoint with a VM-Series Interface boosts direct connectivity within your private cloud—no need for public IP addresses or Internet gateways. If you wonder about auto-scaling with Amazon ELB Service, yes, VM-Series Firewalls can adapt to traffic changes.
These practices keep your network flexible and secure against threats across both IPv4 and IPv6 addresses. Next, we’ll delve into troubleshooting common deployment challenges to keep everything running smoothly.
FAQs
1. What do I need before deploying a VM-Series Firewall in AWS?
Before you dive into the deployment, ensure you’ve got all prerequisites covered. This means setting up your AWS environment, understanding the shared responsibility model of public clouds like Amazon AWS, and having a BYOL (Bring Your Own License) for your VM-Series firewall. Don’t forget to check if your network is ready with proper subnets and IP addresses.
2. How do I choose the right VM-Series Model for my needs?
The key here is to analyze your network’s demands—think about traffic volume, security requirements, and whether you’ll need advanced features like TLS 1.3 decryption or IPsec tunneling. Then, navigate through the AWS Marketplace; it’s stocked with options tailored for various scales of operation from small businesses to large enterprises.
3. Can you guide me through the initial setup of my VM-Series on AWS?
Absolutely! Start by accessing the VM-Series Firewall interface—this will be your command center. From there, embark on a basic setup journey: configure network settings including interfaces and default gateway, then dive into security policies creation… Remember to encrypt sensitive data and manage access carefully!
4. What are some best practices for configuring security policies on my firewall?
First things first—define clear rules that align with your business goals while blocking malicious websites and phishing attempts dead in their tracks! Implement threat prevention mechanisms diligently; leverage machine learning if possible for an edge in detection accuracy… And always keep those TLS certificates up-to-date!
5. How can I integrate my firewall seamlessly with other AWS services?
Integration can supercharge your firewall’s capabilities! Connect it to native services like CloudWatch for real-time monitoring bliss—it’s like having eyes everywhere… Also consider leveraging serverless architectures or databases within AWS; they play well together ensuring smooth sailing across your digital landscape.
6. Facing challenges? Here’s how to troubleshoot common issues…
Don’t fret when bumps appear on the road—start by checking logs through portals or command line interfaces; these often hold clues… Ensure networking configurations such as subnets or private IP addresses are correctly set up… And remember—the community forums and GitHub repositories are treasure troves of wisdom shared by fellow DevOps warriors just like yourself!
7. Why do I need to set up a Palo Alto Support account after configuring my firewall on AWS, and how do I do it?
Setting up a Palo Alto Support account after deploying your firewall on AWS is crucial for accessing software updates, managing licenses, and receiving technical support. It is easy, just select the option to create a new account at support.paloaltonetworks.com.
Conclusion
Diving into the world of AWS firewalls can seem daunting at first. Yet, with the right guide, it becomes an achievable task even for junior network engineers. This step-by-step manual lays out everything needed – from setup to scaling your VM-Series Firewall.
Imagine securing your network effectively, optimizing costs, and enhancing performance across the board. That's what deploying a firewall in AWS promises. Let this journey transform not just your network's security posture but also your confidence in navigating cloud environments.
If you liked this article, remember to subscribe to miamicloud.com/. Connect. Learn. Innovate.
Today, Miami Cloud helps corporate professionals over 40 stay off the layoff list, and get back fast if they end up on it. Start with the free Career Defense Playbook, or get the free Career Inventory Worksheet.
Easy Guide: How to Disable Google SGE (Search Generative Experience)
If you’re tired of Google’s personalized search results and want to regain control of your browsing experience, you’re in the right place. In this section, we’ll provide you with a step-by-step guide on how to disable Google SGE (Search Generative Experience). With our easy-to-follow instructions, you’ll be able to turn off this feature in no time.
But first, let’s talk about what Google SGE is and why you might want to disable it.
Key Takeaways:
Google SGE (Search Generative Experience) is a feature that offers personalized content based on your browsing history and other data.
Disabling Google SGE can help to ensure more unbiased search results.
Follow our step-by-step guide to disable Google SGE on both desktop and mobile devices.
If you’re looking for an alternative to Google SGE, there are private search engines and non-personalized searches available.
Take control of your browsing experience and regain your privacy by disabling personalized searches.
Understanding Google SGE
Google SGE (Search Generative Experience) is a feature that customizes your search results based on your browsing habits and personal information. It aims to provide a more personalized experience tailored to your interests.
While this feature can be helpful, it can also have a significant impact on your search results. Depending on your search history and preferences, your results may differ from those of other users, leaving you with biased content that reinforces your existing beliefs and opinions.
Personalized content can also limit your exposure to new ideas and information, as search algorithms may only show you results that match your previous searches, rather than presenting you with a diverse range of perspectives.
It’s essential to be aware of these potential drawbacks of Google SGE and to take steps to ensure that you are receiving unbiased search results that are not influenced by your browsing history or personal information.
The Impact of Google SGE on Search Results
Google SGE can have a significant impact on the search results you see. Its personalized nature means that you may see results that are tailored to your interests, rather than providing a neutral and diverse range of perspectives. This impact is especially true for controversial topics, where there may be a wide range of viewpoints.
For example, if you have a history of searching for conservative political viewpoints, Google SGE may prioritize search results that align with those beliefs, even if they are not the most relevant or comprehensive sources of information available. Similarly, if you have a history of searching for environmental activism, you may be presented with an overrepresentation of news articles from Greenpeace and other groups that align with that perspective.
Personalized Content in Google SGE
Personalized content in Google SGE is designed to provide you with more relevant and engaging search results. This content can include news articles, videos, and social media posts that are tailored to your interests.
However, personalized content can also limit your exposure to new ideas and perspectives, as search algorithms may only show you content that matches your previous searches, rather than presenting you with a diverse range of viewpoints. This can create a “filter bubble,” where you only see content that reinforces your existing beliefs and opinions.
It’s essential to be aware of these potential drawbacks of personalized content and to take steps to ensure that you are receiving a diverse range of perspectives when using Google SGE.
Reasons to Disable Google SGE
While Google SGE can provide a more personalized browsing experience, there are several reasons why you might want to disable it. One of the most prominent concerns is privacy. With Google SGE enabled, the search engine accesses your browsing history, location, and other personal data to provide a tailored experience. However, some users may prefer to keep their online activity private and disable personalized searches.
Another reason to disable Google SGE is to achieve more unbiased search results. While personalized searches can bring up content that is more relevant to your interests, it can also limit the variety of results you see. Disabling Google SGE allows you to see a broader range of content and make more informed decisions based on unbiased information.
For example, imagine you’re searching for information about a political issue. With Google SGE enabled, the search results you see may only align with your previous browsing history and political preferences. With Google SGE disabled, you’re more likely to see a range of viewpoints and perspectives, allowing you to form a well-rounded understanding of the topic.
Note: Keep in mind that disabling Google SGE may result in a less personalized browsing experience, with less relevant content tailored to your interests. However, it also allows for a more neutral online environment and greater control over your browsing experience.
How to Disable Google SGE on Desktop
If you primarily use Google on your desktop, disabling SGE is a straightforward process. We’ve outlined two methods below:
Method
Description
Method 1: Browser Settings
Open Google Chrome on your desktop.
Click on the three vertical dots on the top-right corner of your browser.
Select “Settings” from the drop-down menu.
Scroll down and click on “Advanced”.
Under “Privacy and security,” click on “Content settings”.
Click on “Cookies”.
Toggle on “Block third-party cookies”.
Return to the “Content settings” menu, click on “Search engines”.
Select “Google” and click on “Manage” next to it.
Toggle off “Make searches and browsing better”.
Method 2: Search Preferences
Go to Google.com and ensure you’re signed in.
Click on “Settings” located at the bottom-right corner of the page.
Click on “Search settings”.
Click on “Region Settings” and select “Worldwide”.
Scroll down to the “Google Instant predictions” section.
Select “Never show Instant results”.
Click on “Save” at the bottom of the page.
Follow the above instructions to enjoy a more neutral browsing experience. Are you browsing on mobile devices? Find out how to disable Google SGE on your smartphones or tablets in the next section.
How to Disable Google SGE on Mobile Devices
If you primarily browse the web on your mobile device, it’s important to know how to disable Google SGE. Here’s a step-by-step guide on how to do it:
Open the Google app on your mobile device.
Tap on your profile photo at the top right corner of the screen.
Select “Search Settings”.
Toggle off the “Use recent searches & activity to personalize Search Experience” option.
Restart the Google app for your changes to take effect.
It’s important to note that disabling Google SGE on your mobile device may impact personalized content, such as news articles and YouTube videos. However, it will help protect your privacy and provide more unbiased search results.
If you use a browser to access Google on your mobile device, disabling Google SGE is similar to disabling it on your desktop. Simply go to your browser’s settings and adjust your search preferences accordingly.
Why Should You Disable Google SGE on Your Mobile Device?
With Google SGE enabled, your mobile search results will be personalized based on your search history, location, and other online activity. While this may provide a more personalized experience, it also means that your searches are not entirely unbiased, and your privacy is at risk.
Disabling Google SGE will help prevent Google from collecting and using your data to personalize your search results, providing a more neutral experience. It’s a small step you can take to protect your online privacy and maintain control over your browsing experience.
Alternatives to Google SGE
If you’re concerned about personalized searches and want to explore alternative search engines, there are many private search engines available. These alternatives offer a more unbiased browsing experience and prioritize your privacy. Here are some popular options:
DuckDuckGo – This search engine is well-known for its strict privacy policy and doesn’t track your searches or store your personal information. It offers non-personalized search results and has a clean interface that’s easy to navigate.
StartPage – This search engine is known for its privacy-friendly search results and doesn’t collect any personal data. It uses Google search results but doesn’t include personalized content.
Qwant – This search engine uses its own index to deliver non-personalized search results and doesn’t track or store any personal information. It also offers additional features such as anonymous browsing and encryption options.
Another option is to conduct non-personalized searches on Google by turning off personalized searches in your settings. This way, you can continue to use Google for its comprehensive search results, but without the personalized content.
Keep in mind that these options may vary in terms of search results accuracy and relevance, so it’s advisable to try different options and see which one suits your browsing needs best.
Take Control of Your Browsing Experience
By following the steps outlined in this guide, you can take control of your browsing experience and disable personalized searches. This will help you regain your privacy and enjoy a more neutral online environment.
Remember, by disabling Google SGE, you’ll be able to enjoy search results that are unbiased and not influenced by your browsing history or previous searches. This can be particularly useful if you’re conducting research or trying to find information on a specific topic.
Overall, taking control of your browsing experience is about putting your needs and interests first. By disabling personalized searches, you can ensure that you’re getting the most relevant and unbiased results possible, while also protecting your privacy and data. So why not give it a try?
FAQ
What is Google SGE and why should I disable it?
Google SGE, or Search Generative Experience, is a feature that personalizes search results based on your browsing history and preferences. While this may enhance your search experience, some users may have privacy concerns or prefer unbiased search results. Disabling Google SGE allows you to regain control over the content you see.
How does Google SGE impact search results?
Google SGE can affect search results by displaying personalized content tailored to your interests and previous searches. This means that the search results you see may differ from what others see when conducting the same search. By disabling Google SGE, you can view more neutral search results that are not influenced by your browsing history.
How can I disable Google SGE on my desktop?
To disable Google SGE on your desktop, you have a few options. One method is to adjust your browser settings. For example, in Google Chrome, you can go to the “Settings” menu, select “Search engine preferences,” and choose to disable personalized searches. Another option is to modify your search preferences directly on the Google search page. Look for the settings or gear icon, click on it, and navigate to the “Search settings” option. From there, you can disable personalized search results.
Can I disable Google SGE on my mobile devices?
Yes, you can disable Google SGE on your mobile devices as well. The process may vary depending on the operating system and the specific app you are using. In general, you can access the app settings on your mobile device, look for the search settings, and disable personalized search results. Alternatively, you can open the Google search app, tap on your profile picture or initials, go to “Settings,” and choose to disable personalized searches.
Are there any alternatives to Google SGE?
Absolutely! If you want an alternative to Google SGE, there are private search engines available that prioritize user privacy and provide non-personalized search results. Some popular options include DuckDuckGo, Startpage, and Qwant. These search engines do not track your browsing activity and offer a more impartial search experience.
What are the benefits of disabling personalized searches?
Disabling personalized searches allows you to regain control over your browsing experience and protect your privacy. It ensures that search results are not biased by your previous searches or personal preferences. By opting out of Google SGE, you can experience a more neutral and objective online environment.
If you liked this article, remember to subscribe to miamicloud.com/. Connect. Learn. Innovate.
Today, Miami Cloud helps corporate professionals over 40 stay off the layoff list, and get back fast if they end up on it. Start with the free Career Defense Playbook, or get the free Career Inventory Worksheet.
Miami for Remote Workers: Top Guide for Digital Nomads
Welcome to Miami, the perfect spot for digital nomads looking to combine work and play. With its vibrant city life, stunning beaches, and thriving nomad community, Miami offers a unique and exciting experience for remote workers. Whether you’re looking to sip cafés while working on the beach or find a cozy coworking space in the heart of the city, Miami has something to offer for everyone.
Miami is a vibrant city with a laid-back atmosphere, making it perfect for digital nomads.
The city boasts some of the best beaches in the country, offering plenty of opportunities for relaxation and leisure activities.
There are numerous coworking spaces in Miami, such as Brickell, Wynwood, and South Beach, providing a professional work environment.
From exploring the vibrant neighborhoods like Little Havana and Coconut Grove to indulging in the culinary delights at the local restaurants, there are plenty of things to do and see in Miami.
With its diverse nomad community and high-speed internet access, Miami is an ideal destination for remote workers looking for a work-life balance.
Living in Miami Overview
Welcome to Miami, a city that offers a vibrant lifestyle and a unique blend of Latin American and American cultures. Living in Miami means immersing yourself in the energetic atmosphere of this vibrant city while enjoying its beautiful beaches and diverse range of activities. Whether you’re a digital nomad or simply looking to experience a new way of life, Miami has something for everyone.
Beaches
One of the biggest draws of living in Miami is its stunning beaches. From the famous South Beach to the lesser-known hidden gems, Miami’s beaches offer the perfect backdrop for relaxation and recreation. Spend your weekends soaking up the sun, swimming in the clear blue waters, or engaging in exciting water sports.
Vibrant City
But Miami is more than just its beaches. It’s a city that pulsates with life and offers a multitude of opportunities for digital nomads. The city is a melting pot of cultures, creating a vibrant and diverse environment that fuels creativity and inspiration. Whether you’re a foodie looking to sample culinary delights from around the world or an art lover seeking inspiration in the city’s many galleries and museums, Miami has something to offer.
Business Resources
For digital nomads, Miami provides access to a variety of amenities and resources. The city is home to numerous coworking spaces, where you can work alongside like-minded individuals and tap into a thriving nomad community. Additionally, Miami’s vibrant startup scene and entrepreneurial spirit create ample job opportunities and networking possibilities for those looking to establish themselves professionally.
Daily Life
Living in Miami means embracing the city’s dynamic and cosmopolitan lifestyle. Enjoy the vibrant nightlife, indulge in world-class dining experiences, or explore the city’s eclectic neighborhoods, each with its own unique charm. Whether you choose to live in the heart of downtown Miami or in one of the surrounding neighborhoods, you’ll have access to a wide range of entertainment options, cultural events, and outdoor activities.
Miami truly offers a lifestyle like no other. Its combination of beautiful beaches, diverse and vibrant culture, and exciting opportunities for digital nomads make it an ideal destination for those seeking a blend of work and play. Experience Miami’s unique charm and start living the Miami lifestyle today.
Digital Nomad Personal Experience in Miami
As a digital nomad in Miami, I can say that the experience is truly one-of-a-kind. The city’s laid-back atmosphere combined with its vibrant Miami lifestyle creates the perfect work-life balance. Being able to work remotely while enjoying beach life is a dream come true.
When it comes to finding the ideal location, having a central spot close to the beach is essential. Miami offers a range of neighborhoods that provide both convenience and the beach lifestyle digital nomads crave. With a central location, you can easily explore the city and take advantage of all it has to offer.
However, it’s important to keep in mind the budget and cost of living in Miami. While the city offers an incredible lifestyle, it can be on the pricier side. It’s crucial for digital nomads to manage their budget wisely to ensure a comfortable stay in such a desirable location.
Living and working in Miami has allowed me to enjoy the best of both worlds. I start my day with a stroll along the beach, soaking in the warm sunshine and ocean breeze. Then, I head to one of the many beachside cafes or coworking spaces to get my work done. The blend of work and play in Miami is truly unparalleled.
Another aspect that sets Miami apart is the incredible diversity and cultural fusion you’ll experience. Miami’s unique blend of Latin American and American cultures creates a vibrant and dynamic atmosphere. From the art scene in Wynwood to the Cuban influence in Little Havana, there’s always something new and exciting to explore.
For those seeking a work-life balance that includes beach life, Miami is the ideal destination. The city’s energy is contagious, and you’ll find yourself inspired to work hard and enjoy all that Miami has to offer.
My Top Tips for Digital Nomads in Miami:
Research and plan your budget carefully to make the most of your time in Miami.
Choose a central locationclose to the beach to enjoy the best of both worlds.
Explore Miami’s diverse neighborhoods and immerse yourself in the unique cultures and experiences each one has to offer.
Take advantage of the beachside cafes and coworking spaces to find the perfect work environment.
Make time to enjoy the vibrant nightlife and cultural events that Miami is known for.
Whether you’re sipping cocktails on the beach or finding inspiration in the city’s thriving arts scene, Miami offers a digital nomad experience unlike any other. Embrace the Miami lifestyle, soak up the beach life, and discover the perfect work-life balance in this vibrant city.
Work in Miami
Miami offers a range of job opportunities for digital nomads looking to work in a dynamic and thriving city. With its diverse economy and vibrant business scene, Miami is home to many international and national companies, making it a hub for various industries.
Whether you’re a freelancer, remote worker, or seeking full-time employment, Miami provides a wealth of job opportunities to suit your skills and interests. From tech startups to finance, hospitality, and creative industries, there are abundant options to explore.
To enhance your work experience, Miami offers numerous coworking spaces that cater specifically to the needs of digital nomads. These spaces provide a professional environment equipped with high-speed internet, comfortable workstations, and networking opportunities with like-minded individuals.
Coworking spaces such as LAB Miami, Büro Miami, Miami Shared, WeWork Miami, Pipeline working spaces, and Tambo Works are popular choices among digital nomads in Miami. These spaces offer flexible membership options, enabling you to work in a collaborative setting while enjoying the freedom and flexibility of remote work.
Whether you’re seeking employment or looking to establish your own business, Miami provides countless opportunities for digital nomads to thrive in a supportive and dynamic work environment.
Top Coworking Spaces in Miami
Coworking Space
Location
Features
LAB Miami
Wynwood
Community events, workshops
Büro Miami
Multiple locations
Flexible membership options
Miami Shared
Brickell
Networking opportunities
WeWork Miami
Multiple locations
Modern amenities, global network
Pipeline working spaces
Brickell
Private offices, professional environment
Tambo Works
Downtown Miami
Collaborative workspaces, events
Best Places to Work in Miami
Miami offers a variety of coworking spaces that cater to the needs of digital nomads. These spaces provide the perfect environment for remote work, with unique amenities and professional settings.
If you’re looking for the best places to work in Miami, consider the following options:
LAB Miami: Located in the vibrant Wynwood neighborhood, LAB Miami offers a collaborative community and creative workspaces. It’s a great place for networking and connecting with like-minded professionals.
Büro Miami: With several convenient locations across Miami, Büro Miami provides flexible workspace solutions. Their modern and stylish offices are equipped with all the necessary amenities.
Miami Shared: Situated in the heart of downtown Miami, Miami Shared offers a range of coworking options. From private offices to open work areas, this space is designed to foster productivity and collaboration.
WeWork Miami: As a well-known coworking provider, WeWork Miami offers multiple locations throughout the city. Their beautiful workspaces come with a plethora of amenities, including onsite support and networking events.
Pipeline working spaces: With its premium locations in Brickell, Pipeline working spaces offer a luxurious and professional environment. Their state-of-the-art offices are tailored to meet the needs of modern professionals.
Tambo Works: Located in the trendy Coconut Grove neighborhood, Tambo Works provides a welcoming and vibrant workspace. Their comfortable and inspiring spaces make it easy to stay productive and motivated.
No matter which coworking space you choose in Miami, you’ll have access to high-speed internet, comfortable workstations, meeting rooms, and various amenities to enhance your work experience.
“A productive work environment is essential for digital nomads, and Miami offers a range of coworking spaces that meet their needs.”
Miami offers a range of neighborhoods for digital nomads to live in. Whether you prefer a beachfront retreat or a vibrant urban setting, Miami has something for everyone. Here are some of the best places to live in Miami:
1. Miami Beach
Known for its stunning beaches and lively nightlife, Miami Beach is a top choice for those who want to live the beach life. With its vibrant atmosphere, trendy restaurants, and art deco architecture, Miami Beach offers a unique combination of relaxation and excitement.
2. Downtown Miami
If you prefer a fast-paced urban lifestyle, Downtown Miami is the place to be. This bustling neighborhood is known for its high-rise buildings, thriving business district, and cultural attractions. Enjoy a vibrant arts scene, world-class dining, and a dynamic cityscape.
3. Edgewater
Located just north of Downtown Miami, Edgewater offers a mix of residential and commercial spaces. This up-and-coming neighborhood is known for its luxury waterfront condos, trendy restaurants, and proximity to the Wynwood Arts District.
4. Overtown
Overtown is one of Miami’s oldest neighborhoods and is now experiencing a revitalization. With its rich history, vibrant music scene, and close proximity to Downtown Miami, Overtown offers a unique cultural experience.
5. Coconut Grove
If you’re looking for a more laid-back lifestyle, Coconut Grove is the perfect choice. This charming neighborhood is known for its bohemian vibe, lush green spaces, and waterfront parks. Enjoy outdoor activities, waterfront dining, and a close-knit community.
6. North Miami
For a suburban feel within city limits, North Miami is a great option. This diverse neighborhood offers a mix of residential areas, shopping centers, and parks. North Miami is also home to Florida International University (FIU) and the Museum of Contemporary Art (MOCA).
These are just a few of the best places to live in Miami. Each neighborhood offers its own unique charm, amenities, and lifestyle. When choosing the perfect place to live in Miami, consider your preferences, budget, and proximity to the activities that matter most to you.
Explore the diverse neighborhoods of Miami and find your ideal home in this vibrant city!
Best Neighborhoods
Miami is home to several neighborhoods that are highly sought after by digital nomads. These neighborhoods offer a diverse range of amenities and attractions, making them ideal for residents looking for an exceptional living experience. Whether you prefer the bustling city life, the laid-back beach vibes, or the vibrant cultural scene, Miami has a neighborhood that suits your preferences.
Miami Beach
Miami Beach is synonymous with luxury and leisure. This iconic neighborhood is known for its stunning beaches, glamorous resorts, and vibrant nightlife. Enjoy a day of sun-soaked relaxation or indulge in the lively beach parties that Miami Beach is famous for. With its world-class shopping, dining, and entertainment options, Miami Beach offers a glamorous and lively atmosphere.
Downtown Miami
Downtown Miami is the bustling heart of the city. This vibrant neighborhood offers a mix of business, culture, and entertainment. Here you’ll find towering skyscrapers, corporate headquarters, and a thriving arts scene. Explore the shops and restaurants along Biscayne Boulevard or catch a basketball game at the American Airlines Arena. Downtown Miami is a dynamic neighborhood that brings together the best of Miami’s urban lifestyle.
Edgewater
Located just north of Downtown Miami, Edgewater offers a waterfront living experience with stunning views of Biscayne Bay. This up-and-coming neighborhood is known for its luxury high-rise condominiums and trendy restaurants. Enjoy waterfront parks, upscale shopping, and a vibrant arts and culture scene in Edgewater.
Overtown
Overtown is a historically significant neighborhood that is undergoing revitalization. It is known for its rich African-American heritage and contributions to Miami’s cultural landscape. Explore the neighborhood’s historic landmarks and enjoy soul food at local eateries. Overtown is a community that is proud of its history and is becoming an increasingly popular place to live.
Coconut Grove
Coconut Grove is a unique neighborhood that offers a bohemian atmosphere and lush green surroundings. Known for its charming streets lined with cafes, boutiques, and art galleries, Coconut Grove is a haven for artists and creatives. Explore the picturesque parks and waterfront views in this charming and eclectic neighborhood.
North Miami
North Miami is a vibrant and diverse neighborhood that offers a suburban feel with easy access to urban amenities. It is home to a thriving art scene, with the Museum of Contemporary Art attracting visitors from all over. Enjoy the beautiful parks, family-friendly neighborhoods, and a wide range of dining options in North Miami.
Bohemian atmosphere, cafes, boutiques, art galleries
North Miami
Diverse community, art scene, family-friendly neighborhoods
Each of these neighborhoods in Miami offers its own unique charm and lifestyle. Whether you’re looking for a glamorous beachfront experience, a bustling city atmosphere, or a bohemian haven, Miami has the perfect neighborhood for you. Explore these best neighborhoods and find your ideal place to call home in the vibrant city of Miami.
Miami: A Digital Nomad’s Haven for Seamless Connectivity
Miami stands out as a premier destination for digital nomads, thanks to its widespread and free WiFi access. This connectivity ensures that remote workers can easily blend the city’s lively atmosphere and scenic beauty with their professional responsibilities.
Enhanced WiFi Accessibility for Remote Work:
Extensive Network of Free WiFi: Miami boasts over 3,895 free WiFi hotspots, ensuring that digital nomads are never far from a high-speed internet connection. This extensive network includes popular spots like Hyde Resort & Residences and Dolphin Mall, along with numerous hotels, cafes, and public areas throughout the city.
Work from Anywhere: Whether you’re planning to work from the vibrant streets of Wynwood, the tranquil beaches of Miami Beach, or the dynamic Downtown area, you’ll find reliable WiFi to support your workday. Miami’s commitment to digital accessibility makes it easy for nomads to find the perfect spot for productivity.
Coworking Spaces and Cafés: Miami’s coworking spaces and cafes are not just about great coffee and networking opportunities—they also offer robust WiFi connections. These spaces are designed to foster creativity and productivity, catering to the city’s thriving community of remote workers and entrepreneurs.
Tips for Leveraging Miami’s WiFi Network:
Leverage WiFi Mapping Tools: Utilize tools like the WiFi Map app to discover and plan your work locations ahead of time. This can help you identify hotspots near your living area or in neighborhoods you plan to explore. A link to the wifi map is here to help you stay connected.
Have a Plan B: Despite the abundance of free WiFi, it’s wise to have a backup internet solution, such as a mobile hotspot or a data plan, for times when public WiFi is unreliable or overcrowded. I’m doing a review on Travel Wi-Fi / Pocket Router’s which will be here when ready.
Prioritize Online Security: Always use a Virtual Private Network (VPN) when connecting to public WiFi networks. A VPN ensures your online activities and data remain secure and private, protecting you from potential cyber threats.
Find an Apartment in Miami
Finding an apartment in Miami can be a challenge, especially considering the cost of living. However, with careful research and planning, you can find the perfect rental that fits within your budget.
The first step in your search for an apartment in Miami is to determine your budget. Take into account your monthly income, expenses, and desired lifestyle. This will help you set a realistic budget and narrow down your options.
Next, consider the neighborhoods that align with your preferences and needs. Miami offers a diverse range of neighborhoods, each with its own unique character and amenities. Whether you prefer a bustling urban environment or a laid-back beach lifestyle, there is a neighborhood in Miami for everyone.
Once you’ve identified your ideal neighborhoods, start looking for rental listings in those areas. There are several online platforms and real estate agencies that can help you find available apartments in Miami. Be sure to check for any additional fees or requirements, such as security deposits or credit checks.
Key Consideration Factors
As you browse through listings, pay attention to factors like the size and condition of the apartment, amenities offered, and proximity to essential facilities like grocery stores, public transportation, and recreational areas.
Consider reaching out to local real estate agents or property managers who can provide personalized assistance and guidance in your apartment search.
Pro Tip: It’s recommended to visit the apartments in person before making a final decision. This will give you a better sense of the neighborhood, the condition of the property, and whether it aligns with your expectations.
“Finding an apartment in Miami can be an exciting adventure. Take your time, do thorough research, and don’t hesitate to ask for help. With a little patience, you’ll find the perfect place to call home in this vibrant city.” – Miami Resident
Remember to consider factors such as safety, proximity to your workplace or preferred amenities, and the overall vibe of the neighborhood. Don’t rush into making a decision—take your time to find the best match for your needs.
So, start your search for an apartment in Miami today and embrace the vibrant lifestyle this city has to offer!
Next, let’s explore some of the cheap places to stay in Miami for digital nomads on a budget.
Cheap Places to Stay in Miami
For digital nomads on a budget, Miami offers a variety of affordable accommodations that won’t break the bank. Whether you’re looking for a cheap place to stay near the beach or in the heart of the city, there are plenty of options to choose from. Here are some budget-friendly choices that won’t compromise on comfort:
1. Hostels
Hostels are a popular choice for budget-conscious travelers and digital nomads. They offer affordable dormitory-style accommodations and are a great way to meet fellow travelers. Some popular hostels in Miami include:
SoBe Hostel & Bar
The Freehand Miami
Bikini Hostel
Rock Hostel
2. Budget Hotels
If you prefer a private room but still want to stick to a budget, there are several budget hotels in Miami that offer affordable rates. These hotels provide comfortable accommodations without breaking the bank. Consider the following options:
Ideally located on a budget, the Hotel Shelley is just a short walk from the beach and offers affordable rates.
The Miami Beach International Hostel provides affordable private rooms and is conveniently located near the beach and popular attractions.
The Jefferson South Beach Hotel is another budget-friendly option that offers comfortable accommodations and a central location.
3. Vacation Rentals
For a more personalized and home-away-from-home experience, vacation rentals are a great option. Renting an apartment or a house can be an affordable alternative, especially if you’re planning to stay in Miami for an extended period. Websites like Airbnb offer a wide range of vacation rentals to suit different budgets and preferences.
With these budget-friendly options, you can enjoy your stay in Miami without draining your bank account. Whether you prefer a social atmosphere at a hostel, the privacy of a budget hotel, or the comfort of a vacation rental, there are plenty of affordable accommodations to choose from.
Accommodation
Benefits
Price Range (per night)
Hostels
– Social atmosphere
– Affordable rates
– Great for meeting fellow travelers
Whether you’re exploring the city’s vibrant neighborhoods, relaxing on the beach, or immersing yourself in Miami’s lively culture, these cheap places to stay will provide you with a comfortable and budget-friendly base for your digital nomad journey.
International Digitals Nomads: Miami Visa
If you’re planning to embrace the digital nomad lifestyle in Miami, understanding U.S. visa requirements is crucial. While the U.S. currently does not offer a visa specifically for digital nomads, there are several visa categories that might align with your circumstances. It’s important to research and comply with U.S. immigration laws to ensure your stay is legal and enjoyable.
Tourist Visas and the Visa Waiver Program (ESTA): Many digital nomads enter the U.S. on a tourist visa (B1/B2) or through the Visa Waiver Program, which allows for short visits. These options do not permit formal employment in the U.S., but they may be suitable for travelers intending to work remotely for non-U.S. based companies.
Long-term Stays: For longer durations, other visa categories may be more appropriate, though they come with specific requirements and limitations. Consulting with an immigration attorney can provide guidance tailored to your situation.
Compliance: Always ensure your activities in the U.S. comply with the terms of your visa. Working in a manner not permitted by your visa status can lead to complications with immigration authorities.
Stay Informed: U.S. immigration policies can change, so it’s vital to stay updated on the latest regulations. Official resources such as the U.S. Department of State website and U.S. embassies or consulates are reliable sources for information.
Immigration Rules Considerations
Remember, adhering to immigration rules and obtaining the appropriate visa will help you enjoy your digital nomad experience in Miami to the fullest. Take the necessary steps to ensure legal compliance from the beginning.
General Visa Advice
U.S. Immigration Considerations
Notes for Digital Nomads
Research and gather required documents for visa application.
Familiarize yourself with U.S. visa categories that may allow for temporary work or business visits.
Most digital nomads use tourist (B1/B2) visas for short stays, but these do not permit formal employment in the U.S.
Visit the U.S. Department of State website for official visa information.
Consult the nearest U.S. embassy or consulate for specific advice and requirements.
Be aware of the limitations and conditions of each visa category. Working remotely on a tourist visa may have legal implications.
Prepare supporting documents, including proof of employment, financial stability, and ties to your home country.
Start the visa application process well in advance of your planned travel.
Consider consulting with an immigration attorney to explore visa options that align with your remote work plans.
Undergo an embassy or consulate interview if required.
Allow sufficient time for visa processing and potential delays.
Keep in mind that visa approval is subject to individual circumstances and immigration law.
Conclusion
Miami offers a vibrant and unique lifestyle for digital nomads. With its beautiful beaches, mix of cultures, and range of amenities, Miami is the perfect destination for those looking to combine work and play. Whether you want to enjoy a beachside escape or immerse yourself in the bustling urban experience, Miami has something to offer for every digital nomad.
As a digital nomad in Miami, you can enjoy the laid-back Miami lifestyle while working remotely. The city’s stunning beaches provide the perfect backdrop for a productive workday or a relaxing break. With a vibrant arts scene, diverse culinary options, and exciting nightlife, Miami offers a rich cultural experience and endless opportunities for exploration and enjoyment.
Attracting a diverse community of digital nomads, Miami provides a thriving hub for remote work. The city is home to numerous coworking spaces and job opportunities in various industries. Whether you’re a freelancer, entrepreneur, or remote employee, Miami offers a supportive and inspiring environment for professional growth.
With its picturesque landscapes, warm weather, and vibrant atmosphere, Miami truly is a top guide for digital nomads. So, pack your bags, embrace the Miami lifestyle, and get ready to work and play in this dynamic and energetic city.
If you liked this article, remember to subscribe to miamicloud.com/. Connect. Learn. Innovate.
FAQ
What makes Miami a popular destination for digital nomads?
Miami’s combination of a vibrant city atmosphere, beautiful beaches, and diverse cultural experiences make it an attractive destination for digital nomads.
What are some of the best neighborhoods for digital nomads to live in Miami?
Some of the best neighborhoods for digital nomads in Miami include Miami Beach, Downtown Miami, Edgewater, Overtown, Coconut Grove, and North Miami.
Are there coworking spaces available for digital nomads in Miami?
Yes, there are numerous coworking spaces in Miami, including LAB Miami, Büro Miami, Miami Shared, WeWork Miami, Pipeline working spaces, and Tambo Works.
How can I find an apartment in Miami as a digital nomad?
Finding an apartment in Miami can be a challenge, but research and planning ahead can help you find the best rental options within your budget.
Are there cheap places to stay in Miami for digital nomads on a budget?
Yes, there are plenty of cheap places to stay in Miami, including hostels, budget hotels, and vacation rentals.
What are the visa requirements for digital nomads planning to stay in Miami?
Digital nomads planning to stay in Miami should familiarize themselves with the visa requirements and immigration rules. Research the necessary documents and obtain the appropriate visa for your stay in Miami.
Today, Miami Cloud helps corporate professionals over 40 stay off the layoff list, and get back fast if they end up on it. Start with the free Career Defense Playbook, or get the free Career Inventory Worksheet.
Using the Evaporating Cloud: A Conflict Resolution Diagram
Dive deep into the realm of conflict resolution with the Evaporating Cloud, or EC for short, is a transformative tool rooted in the Thinking Process and Theory of Constraints. The EC, also known as a conflict cloud, is a robust tool based on the TOC thinking processes to resolve conflicts in organizations. It fundamentally offers a win-win solution to apparent conflicts, showcasing the logic behind dilemmas and the way to dissolve them.
Whether you’re navigating the intricate pathways of project management or striving for excellence in process improvement, this article offers a step-by-step guide to harnessing the power of the Evaporating Cloud. Unravel the mysteries behind this technique and discover how it can be your compass in the journey toward effective conflict resolution and organizational success.
The Evaporating Cloud
What is the Evaporating Cloud?
The evaporating cloud is a conflict resolution diagram introduced by Eliyahu M. Goldratt. It’s a tool to surface and resolve conflicts or dilemmas in any organizational setting, encouraging a broad vision of the current reality. The term ‘cloud’ symbolizes the obscure view of the conflict with one another, whereas ‘evaporation’ signifies the clarification process.
How does the Evaporating Cloud work?
This tool is designed to address conflict or dilemma situations.
Its four-step process works by:
Identifying the core conflict
Surfacing the underlying assumptions
Validating those assumptions
Resolving the conflict
It employs the logical thinking process to facilitate clarity. The diagram displays the assumptions as arrows pointing from one dilemma to another.
Benefits of using the Evaporating Cloud
EC is renowned for its effectiveness in problem solving, conflict management, and understanding different perspectives resulting in win-win solutions. EC allows the creation of a visible ‘conflict cloud’ showing the constraints, assumptions, and erroneous assumptions within the current reality. The process leads to removing barriers to success and achieving the common objective.
The Conflict Resolution Diagram
Understanding the Conflict Resolution Diagram
The Conflict Resolution Diagram is a powerful thinking tool used in support of conflict resolution. Its logical structure unveils the underlying assumptions that support the conflict. Dettmer, Scheinkopf and Fedurko are some of the key contributors in refining this diagram from the TOC perspective.
Steps to resolve conflicts using the Conflict Resolution Diagram
Step 1: Identify the core conflict
Begin by identifying the primary issue, the central conflict that is restraining the common objective. Known as a conflict, it often stems from a constraint regarding customers, resources, or policies.
Step 2: Surface the underlying assumptions
The conflict resolution diagram allows us to surface the underlying assumptions. These are the taken-for-granted beliefs that are often not explicit but form the foundation of the identified conflict.
Step 3: Validate the assumptions
The next process is to validate these assumptions. In the context of TOC, this step involves using the “Current Reality Tree” (CRT) to prove or disprove the assumptions.
Step 4: Generate and evaluate solutions
The final step creates a space for injecting new solutions, therefore leading to the “evaporation” of the conflict. The solution, ideally, needs to be a win-win outcome satisfying all parties involved.
Using the Evaporating Cloud in Project Management
The role of the Evaporating Cloud in project management
How to set up and use the Evaporating Cloud in project management
Setting up the EC begins by defining the common objective within the project framework and progressively moves along the steps. It results in demystifying conflicts, seeing the logic behind, and manifesting a benchmark for project success and constraint management.
Using the Evaporating Cloud in Process Improvement
The role of the Evaporating Cloud in process improvement
In process improvement, the cloud is the tool of choice for pinpointing and resolving conflicts as it unveils bottlenecks in processes, leading to increased efficiency.
How to set up and use the Evaporating Cloud in process improvement
The initial step is to identify the problematic constraint, followed by revealing assumptions, validating the theory, and generating solutions. This straightforward process leads to optimized operations and expedited improvement.
Conclusion
Overall, the Evaporating Cloud is an effective tool for conflict resolution in both project management and process improvement scenarios. With a blend of logical thinking and the Theory of Constraints thinking, the evaporating cloud makes conflict resolution an achievable goal rather than an intimidating hurdle. Regardless of the setting, it encourages win-win scenarios – a true game-changer for businesses today.
If you liked this article, remember to subscribe to miamicloud.com/. Connect. Learn. Innovate.
Today, Miami Cloud helps corporate professionals over 40 stay off the layoff list, and get back fast if they end up on it. Start with the free Career Defense Playbook, or get the free Career Inventory Worksheet.
Understanding Common Flowchart Symbols: What Do the Flowchart Shapes Mean?
Do you sometimes find yourself puzzled by the myriad of shapes on flowcharts? Decoding these flowchart symbols can be an overwhelming task, especially when each shape carries a unique meaning.
In this blog post, we decipher these cryptic icons to reveal their true meanings, empowering you with knowledge to understand and create effective flowcharts. Ready to dive in? Become a master at interpreting flowchart shapes!
Key Takeaways
Flowcharts are like maps. They use shapes and lines to tell steps in a job or plan.
Each shape in a flowchart has its own meaning. For example, diamonds show the choices we have to make.
There are many types of flowchart symbols: basic, standard, and advanced. Each has special uses and meanings.
Flow lines guide people as they look at the chart. Different line styles mark different paths or info.
Using flowcharts makes work easier. It helps us see tasks and solve problems better!
The Meaning Behind Common Flowchart Symbols and Shapes
Flowchart shapes have clear meanings. Each shape shows a different part of the process. You start and end with terminal shapes, like an oval or rounded rectangle. Rectangles show tasks that need to be done.
If you see a diamond, it stands for a question that needs an answer to decide what comes next.
Circles mean there is more information on another page or chart section. Parallelograms point out inputs or outputs in the flowchart. Understanding these shapes helps you read and use flowcharts better in your projects.
Keep reading to gain deep insights into how those shapes play an integral part in creating effective flowcharts!
How to Organize a Flowchart Effectively
When you create a flowchart, start with a clear goal in mind. The goal will guide what you add to the flowchart. Put all tasks, actions, or operations in rectangles. Draw them from top to bottom or left to right.
Use circles if you need to move people to another page or part of the chart.
Use decision shapes for questions. Your answer will decide where your next step is on the chart. If numbering helps you keep track of each step, feel free to use it. It’s not needed but is okay if it helps!
Use lines and arrows as roads between your boxes and shapes. They tell people where to go next after each step or action taken on your chart.
Basic Flowchart Symbols
In this section, we’ll delve into the fundamental flowchart symbols like circles, rectangles, triangles, trapezoids, diamonds, and more. Each of these symbols has a unique meaning that helps you visualize and streamline processes effectively.
Circle
A circle in a flowchart stands for an action or a step. It tells you what to do in the process. You will often see it at the start or end of a process. EdrawMax has this symbol ready for use in its software.
Rectangle
A rectangle is a key part of a flowchart. It shows tasks or steps in the process. This can be any action, like writing a report or making a phone call. Rectangles give clear plans for what to do next in the project.
So, they help Project Professionals and New Project Managers make sure everything gets done right and on time.
Triangle
In a flowchart, the triangle is not common. But it can still help you. It shows that input or output is held off to one side. This symbol points to a delay in your process map. This pause could be short or long.
It tells you to wait for a while before moving on.
Trapezoid
In a flowchart, the trapezoid shows an operation or process. It sets out steps from start to finish in a neat way. You can change the trapezoid and write on it to give more facts about the task.
It is key to know what a trapezoid means in a flowchart. This helps you make and read flowcharts right. The main tasks in a flowchart are shown in this shape. With clear labels, anyone can understand the action happening at that point of the workflow.
Diamond
A diamond shape in a flowchart stands for a decision spot. It’s one of the main symbols that you can see in most charts. This shape asks you to make up your mind. Each path out of the diamond goes with an answer from this spot.
You use arrows to point it to different shapes next in line. So, it helps show where there are choices in the process flow.
Semicircle
The semicircle is a key shape in flowcharts. It shows the start or end of a process. Most times, you will see it at the top or bottom of the chart. It marks where a flowchart begins or stops.
This little curve helps to set up the flowchart in an easy-to-follow way. By using it, you can make any process clear and simple!
Hexagon
In flowcharts, you see the hexagon shape a lot. The hexagon shows the input and output steps. It tells us how inputs change into outputs by going through certain processes. This is so important in business tasks and other projects.
Let’s take baking a cake as an example! When you bake, things like flour, sugar, and eggs are your “inputs”. Mixing them together is the process. In the end, you get a tasty cake as your “output”.
So in this case, the hexagon would show us going from raw ingredients to yummy dessert!
Standard Flowchart Symbols
Dive into the world of standard flowchart symbols where we decode key markers like the Terminator symbol, denoting start or end points; the Decision symbol, representative of a question or decision point; and the Process symbol, indicating a task or operation within your chart.
Terminator symbol
In a flowchart, the Terminator symbol marks where things start or stop. It looks like a rectangle with rounded edges. You can see this symbol at both ends of a flowchart. So, it shows the first and last steps in any process.
The use of the Terminator helps make clear what is going on in each diagram.
Decision symbol
The decision symbol is a key part of flowcharts. It looks like a diamond shape. This symbol shows us where we need to make choices in the process. We use it to check if something is true or not.
Depending on our answer, we may follow different lines or arrows from this point on the flowchart. So, it helps guide our next steps in the process.
Process symbol
The process symbol is an important sign in a flowchart. It is often shown as a rectangle. This sign tells us about the steps and actions that need to happen in a method. For bigger tasks, we use the sub-process symbol.
If there’s an action we use again and again, we show it with the predefined process symbol. These signs help us understand how things move from start to end in a project or task.
Additional Flowchart Symbols
Diving deeper than the standard shapes, advanced flowchart symbols such as data symbol, connector symbol, and note symbol offer intricate details to map complex processes and workflows more accurately.
Stay with us for an in-depth understanding of their specific uses and meanings.
Data symbol
The data symbol is a neat shape in flowcharts. This shape means that you are either adding information or pulling it out. You might use it to show someone typing on a form. Or, it could mean that you are making a report with numbers and facts.
The data symbol helps non-tech workers understand big projects better.
Connector symbol
The connector symbol plays a big role in flowcharts. It helps to show the path from one shape to another. It links different pages or sections of a flowchart. If the steps of the process don’t fit on one page, this symbol shows that you must go to another page.
The connector sign is part of many advanced symbols used in flowcharts for various tasks and actions. This symbol makes it easy to make large and complex charts with many paths and connections.
Note symbol
The note symbol in a flowchart is like a small teacher. It gives us more details to understand the chart better. We drew it as a rectangle with a round top. We also draw dashed lines to link it with other shapes in the chart.
This symbol helps us make sense of complex steps in the flowchart by giving hints or further information about them. Knowing this symbol lets you read and use flowcharts well, so do not skip it!
Actor symbol
The actor symbol plays a big role in flowcharts. It stands for people or teams that take part in a process or make choices. This symbol can link with other symbols in the flowchart.
This shows how facts move and work gets done between the actor and others.
You will find the actor symbol a lot in business model plans. Here, it tells about the parts different members play and what they have to do. Even software makers use it to show how users connect with their system or interact with its features.
The best part? You can tweak this symbol to fit your flowchart’s needs and aims perfectly!
Document symbol
The document symbol plays a key role in flowcharts. It stands for documents or reports that are part of the process. This sign looks like a rectangle, but it has a wavy line at the bottom.
This quirky shape helps know where data gets put in or taken out in the flowchart steps. The symbol’s use is common when showing steps in an input and output chart to help show how things happen over time.
For any chart you make, knowing what this symbol means can make your work stand out more clearly!
Preparation symbol
The preparation symbol is a cool tool in flowcharts. It shows steps that get things ready for work, not do the actual work. For example, you use it to say “Gather tools” or “Set up machine”.
It’s part of the advanced symbols group. This symbol follows rules set by ANSI and ISO groups. Using it right makes your flowchart easy to understand!
Delay symbol
You see a delay symbol in the flow chart. It has a zigzag line inside a rectangle. This shape tells you there is a wait or pause in the process steps. This could be because some actions need time to finish.
The delay symbol gives you an idea about when and how steps of the project will happen.
Manual input symbol
The manual input symbol is a key part of flowcharts. It shows where someone needs to put in data or do a task by hand. This symbol looks like a rectangle with a rounded bottom and has a smaller rectangle inside.
You see this symbol in many types of charts. These include process flowcharts, workflow diagrams, and data flow diagrams. Using it right makes sure that everyone understands the chart well.
It tells them clearly when they need to step in and do something themselves.
Understanding Flow Lines in Flowcharts
Explore the critical role of flow lines in a flowchart, which guides the viewer through each step and decision. Discover how different line styles can indicate various types of connections or pathways.
Continue reading to master all nuances of using flow lines effectively in your next project!
Regular line
A regular line in a flowchart shows how tasks move. It points from the start to the next step. This tells us what comes after each task. Most times, we read flowcharts from top to bottom or left to right just like a book.
A regular line helps us follow the order of events in this way. Even though some people number the shapes in their flowcharts, it is not needed to understand the chart’s steps because of these lines.
Dashed line
A dashed line in a flowchart has a special use. It shows added detailsnot part of the main process. If there’s extra info, but it doesn’t fit into the main steps, you draw it with a dashed line.
This keeps your chart clean and easy to read, while still giving all the data you need.
Parallel line
Parallel lines play a big role in flowcharts. They show us different paths we can take in the process. These pathways are also called branches. For example, if you have two ways to do something, parallel lines will show both options.
Sometimes, parallel lines tell us that two things are happening at the same time. This is useful when many steps need to be done together. Also, parallel lines help show other choices we might have during the process flow.
Why Use Flowchart Symbols to Map Business Processes?
A flowchart is like a map for a job or plan. It shows all the steps from start to end using signs and lines. Each sign has its own meaning. For instance, rectangles often show tasks we need to do, while diamonds are for making choices.
The lines link the steps in the right order. A well-made flowchart helps us understand how a process works, where it can go wrong, and what we can do to fix it.
People working on projects love using flowcharts because they offer an easy way of showing complex ideas with just simple shapes and arrows! You don’t have to read long texts; you can just follow the chart from top to bottom! Flowcharts also help everyone see their role in a project and make sure no step gets missed.
The Importance of Flowcharts
Flowcharts are big players in the business. They can show what happens at each step of a process or task. This makes it easy to see the whole picture. You can also find any errors or hiccups before they become big problems.
Using flowcharts, you can share ideas with your team members quickly and clearly. Everyone will know their part in a project. It helps avoid confusion and keeps everyone on track.
Having the RFFlow 5 Professional Flowcharting tool is great for creating these kinds of charts. With this tool, even large and complex processes become easier to understand. So, use flowcharts to make your work life smoother and better understood by all!
FAQs
Explore our frequently asked questions to gain further insight into flowchart symbols and their usage. From understanding the most crucial symbol in a flowchart, and deciphering specific shapes like circles, to learning where a flowchart begins—dive deeper into the fascinating world of flowcharts.
Stay tuned for more!
What is a flowchart?
A flowchart is a type of diagram or process map that uses common flowchart symbols to show the steps in a process.
What are some common flowchart symbols and their meanings?
A circle symbol represents the start or end of a process, and a box or rectangle stands for a single step in the process. The diamond shape is used as a decision symbol when choices are needed.
How many flowchart symbols are there?
There are many types of flowchart symbols. People use them to show different parts in a chart. Some charts have only 3 or 4 symbols, but others may have more than 12! For example, EdrawMax has over 26,000 symbols for you to choose from for your charts.
Even so, not all these symbols are used often. Three common ones are process symbols, decision symbols, and arrow symbols. You can also make your own symbol with pencil and pen tools if you need them!
What is the most important flowchart symbol?
The decision symbol is the most important in a flowchart. It looks like a diamond and helps ask questions. The answers to these questions guide the next steps. This way, it decides which path to follow inside the process being shown in the chart.
Every flowchart needs at least one decision symbol for it to work well.
What does a circle mean in a flowchart?
In a flowchart, a circle is more than just a round shape. It creates links from one chart part to another. This means it helps the flow of ideas move through many charts or pages. The circle also works as an inspection point in process mapping.
But, this shape does not change the direction or speed of the flow in any way. We usually draw circles at the top and let them drop down or move left to right.
How do you know where a flowchart begins?
A flowchart starts at a shape called the terminator. This shape looks like an oval or pill. We find it either at the top or on the left side of the chart. The word “Start” is often inside this shape to show where to begin.
Your eyes should follow the lines from this point. Charts usually go from top to bottom or from left to right.
Do all types of flowcharts use the same shapes?
No, different types of diagrams like data flows and decision charts may need additional shapes beyond basic ones like circles, boxes, and diamonds.
Do I need special software to create these diagrams with various symbols?
While many people use specific tools like dedicated software for creating professional-looking charts; simple sketches with commonly used shapes also work well for mapping out ideas.
Are there guides on how to read these chart shapes correctly?
Yes! Flowchart guides exist which explain how each symbol functions within the overall chart plus tell about connections between them using lines called ‘flow lines’.
Conclusion
Using flowcharts helps us see and understand complex tasks. This article has shown how each shape in a flowchart holds special meaning. When we learn to read these shapes, we can make good flowcharts too!
If you liked this article, remember to subscribe to miamicloud.com/. Connect. Learn. Innovate.
Today, Miami Cloud helps corporate professionals over 40 stay off the layoff list, and get back fast if they end up on it. Start with the free Career Defense Playbook, or get the free Career Inventory Worksheet.
Step by Step VMware Home Lab Setup on vSphere 8: Test vMotion and Other Features
Experimenting with VMware features, but lack a proper lab setup? Don’t worry; you’re not alone. Many eager learners face this same challenge. Our step-by-step guide will help you with your very own VMware Home Lab Setup on vSphere, where you can test features like vMotion and more.
Stay tuned for an engaging and practical journey into the world of virtualization!
Key Takeaways
Setting up a VMware Home Lab on vSphere allows you to test features like vMotion and improve your virtualization skills.
To set up the lab, make sure you have the hardware requirements, such as a dual-core processor with virtualization support and 8GB or more RAM.
Follow step-by-step instructions to install VMware ESXi, configure networking, create virtual machines, and test features like vMotion, High Availability, and Distributed Resource Scheduler (DRS).
Troubleshoot common issues like network connectivity problems for vMotion and reduced performance of virtual machines. Implement best practices for optimal performance and security in your home lab environment.
Setting up a VMware Home Lab on vSphere – Step-by-Step
vSphere is VMware’s flagship virtualization platform. At its core, vSphere allows you to create, manage, and run virtual machines and their associated resources on physical hardware.
To set up a VMware Home Lab on vSphere, you will need the necessary hardware requirements and follow these step-by-step instructions.
Hardware requirements for a home lab
You need certain things to set up a home lab. A dual-core processor is needed. This must have AMD-V or Intel VT virtualization support. You will also need about 8GB of RAM. However, having 10 to 12 GB of RAM is much better.
Next, make sure your hardware can work well together for setting up the home lab. Also, the host must be able to meet the demands of the virtual machine’s hardware needs. If not, there could be problems with the CPU working right.
If you use a cluster that has matching hardware parts, it can fix any CPU issues that crop up.
Installing VMware ESXi
First, you need an ESXi installation USB drive. Boot your server from this drive. Your screen will show the ESXi installer starting up. Follow the steps it shows you on screen.
Choose a disk to install ESXi on when asked to choose. Check your system is fine for use with ESXi. Then hit F11 to accept and continue. Set up your root password next, then press Enter to go ahead with the install.
When it is done, take out the USB drive and reboot your server again.
Configuring networking
To set up networking in a VMware home lab, start by picking the network type. vSphere offers three options: standard switch, distributed switch, and hybrid switch. Now, create a VMkernel port on your ESXi host.
This will help with tasks like vMotion. Make sure you enable vMotion while setting up your VMkernel port. The next step is following the vSAN Network Design guide to meet all networking needs for an efficient home lab setup on vSphere.
Creating Virtual Machines
In this step-by-step guide, we will learn how to create virtual machines in our VMware Home Lab on vSphere. First, we need to install VMware Workstation and ESXi on our virtual machines.
These virtual machines can simulate cloud environments, giving you a hands-on experience with cloud computing principles.
We can deploy the vCenter as a nested virtual machine in our setup. It’s important to note that we can build a VMware Home Lab using just a laptop or an existing environment for testing vSphere.
Now let’s get started with creating virtual machines!
Testing vMotion and Other Features
Learn how to migrate a virtual machine using vMotion, utilize High Availability, and understand Distributed Resource Scheduler in your VMware Home Lab. Discover the step-by-step process of testing these essential features and enhance your knowledge of VMware vSphere.
Migrate a Virtual Machine using vMotion
To migrate a virtual machine using vMotion, follow these simple steps:
1. Open the VMware vSphere client and connect to your vCenter Server.
2. Select the virtual machine you want to migrate and right-click on it.
3. From the context menu, choose “Migrate” and then select “Change compute resource.”.
4. In the migration wizard, select the destination host or cluster where you want to move the virtual machine.
5. Choose whether you want to perform a cold migration (powered off) or a hot migration (powered on).
6. Review and confirm your selection, ensuring that all settings are correct.
7. Click “Finish” to start the migration process.
Utilizing High Availability
High Availability (HA) is an important feature in VMware vSphere that helps ensure the continuous availability of your virtual machines. With HA, if one ESXi host fails, the virtual machines running on it can automatically be restarted on another healthy host.
This helps minimize downtime and keeps your applications up and running.
To utilize High Availability, you need to configure a cluster with multiple ESXi hosts. This allows the virtual machines to be distributed across different hosts for redundancy. In case one host fails, the other hosts in the cluster take over its workload.
To set up High Availability, you need to enable it on each individual virtual machine within the cluster. You also need to configure admission control policies that determine whether there is enough capacity in the remaining hosts to handle failures.
It’s worth noting that High Availability requires shared storage among all ESXi hosts in the cluster. This could be through NFS or iSCSI storage solutions. It’s also important to consider network connectivity between hosts for proper communication during failovers.
Understanding Distributed Resource Scheduler
Distributed Resource Scheduler (DRS) is an important feature in vSphere that helps optimize resource usage in our VMware home lab. With DRS, we can automatically balance workloads across multiple ESXi hosts to ensure efficient utilization of resources.
To understand how DRS works, let’s go through the step-by-step process. First, we need to enable and configure DRS on our cluster. This can be done by going to the Cluster Settings and selecting “Turn On” for DRS.
Once enabled, DRS will monitor the resource usage of each virtual machine (VM) in the cluster. It takes into account factors like CPU and memory usage, as well as any reservations or limits set for each VM.
When a host becomes overloaded or underutilized, DRS kicks in and migrates VMs between hosts to balance the workload. This migration process is done live without interrupting the running VMs using vMotion technology.
To manually initiate a migration using DRS, we can right-click on a VM and select “Migrate”. This allows us to choose which host within the cluster we want to move our VM to.
Troubleshooting and Best Practices
Troubleshooting common issues and implementing best practices for performance and security are crucial in maintaining a stable VMware home lab environment.
Common issues and their solutions
One common issue that you might come across when setting up a VMware Home Lab on vSphere is network connectivity problems for vMotion. This can happen if the vmknics used for vMotion are not properly configured on both hosts.
To troubleshoot this issue, you need to check and make sure that the correct vmknics are assigned for vMotion on both hosts.
Another common issue is reduced performance of virtual machines. This is expected when workloads are virtualized, but sometimes there could be unexpected reductions in performance.
To troubleshoot this issue, you should first verify if the reduced performance is indeed unexpected behavior. You can do this by checking resource usage and monitoring any potential bottlenecks.
Configuration errors can also cause virtual machines to become unresponsive, especially when waiting for a resource. If you encounter this issue, it’s important to review your configuration settings and ensure that everything is set up correctly.
Best practices for performance and security
To ensure optimal performance and security in your VMware vSphere home lab, there are some best practices you should follow. First, double-check your storage configuration to avoid any lower-than-expected performance.
It’s important to properly configure your underlying storage devices. Second, make sure to refer to the vSphere Security Configuration Guide for security best practices. This will help you protect your vSphere environment from potential threats.
Lastly, pay attention to network configuration. Properly configuring the network between vCenter Server, ESXi, and other products is crucial for a stable connection. Keep these best practices in mind as you set up and maintain your VMware vSphere home lab for an optimized experience.
FAQs
1. What is a VMware home lab on vSphere?
A VMware home lab on vSphere is a personal setup where you can test vMotion and other features using ESXi 8.0 or ESXi 7.
2. How do I build a VMware home lab?
To build a VMware homelab, first install vSphere, then add the ESXi server and deploy the vCenter Server Appliance.
3. Can I create nested VMs in my VMware homelab?
Yes, with nested virtualization you can run an ESXi server inside another as nested VMs to try out more VMware products in your lab.
4. What are some uses of having multiple ESXi hosts in my lab?
Having a second ESXi host lets you use features like vSphere HA for better fault tolerance and lets you connect both hosts to shared storage for data sharing.
5. How does one use VSphere 8 at their vmware homelab?
You apply VSphere 8 by installing it on each of your servers running esxi, after which it controls all functions of your homelab including the creation of new virtual machines
6.Does VSphere let me interact with all versions of esxi at my vmware lab?
Indeed! VsPhere will allow you to link up with older versions too – from single esxi version like esxi 6.x to newer ones such as Esxi 8.
Conclusion
In conclusion, setting up a VMware Home Lab on vSphere is a great way to test features like vMotion. By following the step-by-step instructions and considering hardware compatibility, you can create your own virtual environment for learning and experimentation.
Don't forget to check out online communities like "vmware homelab" for additional resources and support. Happy lab building!
If you liked this article, remember to subscribe to miamicloud.com/. Connect. Learn. Innovate.
Today, Miami Cloud helps corporate professionals over 40 stay off the layoff list, and get back fast if they end up on it. Start with the free Career Defense Playbook, or get the free Career Inventory Worksheet.
Pros and Cons if You Use a Real or Virtual Background For Your Zoom or MS Teams Remote Video Call
Ever wondered whether to use a virtual background during your Zoom or Teams meeting? In the last year, over 300 million people have participated in daily video conferences. This debate surrounding whether to use a virtual background can be daunting with strong contenders for both sides.
With this blog, we will delve into the pros and cons of the topic. We will also share tips on how to choose an appropriate background that enhances professionalism without sacrificing authenticity.
Let’s unlock the potential of your online presence together!
Key Takeaways
Virtual backgrounds can increase professionalism and privacy by hiding personal surroundings during Zoom and Teams meetings.
However, using virtual backgrounds can also be distracting and may give off an artificial vibe, so it’s important to strike a balance between creating a visually appealing background and maintaining authenticity.
When choosing a virtual background, consider the purpose of the meeting and select appropriate, non-distracting backgrounds that align with your professional image. Also, consider alternatives like using a physical backdrop or adjusting camera angles to create a professional and distraction-free environment for video meetings.
Pros and Cons of Using Virtual Backgrounds
Using virtual backgrounds in Zoom and Teams meetings has its advantages, such as increasing professionalism by hiding personal surroundings and ensuring privacy. However, there are also concerns about distractions and authenticity that need to be taken into consideration before deciding to use a virtual background.
Increased professionalism and privacy
Using a virtual background boosts your professionalism while working remotely. It hides your real surroundings. That way, you can attend meetings from any place. Your bedroom, kitchen, or even a loud café will seem like an office space! It keeps your private life away from work talks.
People cannot see unexpected things behind you. In short, it gives you control over what people see and think about you in online meetings.
Distraction and authenticity concerns
Using virtual backgrounds in Zoom and Teams meetings can come with its fair share of distraction and authenticity concerns. While these backgrounds can provide privacy and make your surroundings look more professional, they may sometimes cause visual distractions or give off an artificial vibe.
For example, if the background image is too busy or constantly moving, it can take away from the focus on the meeting itself. Additionally, using a virtual background might raise questions about whether you’re trying to hide something or create a false impression.
A starship enterprise background may be good for virtual happy hours. However, if you are in a more conservative industry or setting, having an outer-space background with aliens may call your professionalism into question.
It’s important to strike a balance between creating a visually appealing background and maintaining authenticity in your online presence.
What are the “Top Tips” if You Use a Virtual Background?
Consider the purpose of the meeting and select appropriate, non-distracting backgrounds that align with your professional image.
Consider the purpose of the meeting
Think about why you are having the meeting in the first place. Is it a formal business meeting or a casual catch-up with colleagues? The purpose of the meeting is to help you decide if using a virtual background is appropriate.
For professional meetings, it’s best to choose a background that looks polished and reflects your work environment. If it’s an informal gathering, you can be more creative with your background choice.
By considering the purpose of the meeting, you can select a virtual background that aligns with the tone and objectives of your discussion without distracting participants.
Select appropriate and non-distracting backgrounds
To make a good impression in virtual meetings, it’s important to choose the right background. Opt for backgrounds that are suitable for the purpose of the meeting and avoid ones that may be distracting or unprofessional.
Blur virtual backgrounds work well for video conferencing as they are not distracting. Blur is like “white noise” as it tends to be subtle (easy on the eyes) as a background option.
Test out your selected background before the actual meeting to ensure it looks good and doesn’t cause any technical issues. By selecting appropriate and non-distracting backgrounds, you can create a more focused and productive environment for online discussions.
Test the background before the meeting
Before your meeting starts, it’s important to test the virtual background you plan to use. This way, you can make sure it looks professional and doesn’t distract others. Check how it appears on your screen and whether any parts of your body or objects get cut off.
You don’t want half of your head disappearing during an important presentation! By testing the background beforehand, you can avoid any surprises and ensure a smooth and visually appealing meeting experience for everyone involved.
What are the Alternatives to Virtual Backgrounds if You Use a Real Background?
To add a touch of professionalism and authenticity to your virtual meetings, you can consider using a physical backdrop or setting instead of relying solely on virtual backgrounds.
By choosing an appropriate location in your home or office, such as a tidy bookshelf or a blank wall, you create a visually pleasing and distraction-free environment for your video calls.
This helps convey a polished image and enhances the overall quality of your online presence. Additionally, adjusting the camera angle or lighting can further improve the visual appearance, allowing others to focus on what really matters – meaningful conversations and effective communication.
Adjusting the camera angle or lighting
To improve your online meeting experience, consider adjusting the camera angle and lighting. Find a position that shows your face clearly without any distractions in the background.
Make sure there is enough light on your face so others can see you well. Experiment with different angles and lighting setups to find what works best for you. By making these adjustments, you can enhance your visual presence and create a professional image during virtual meetings.
What are some Custom Alternatives to Standard Virtual Backgrounds?
In addition to the standard virtual backgrounds that are available in Zoom and MS Teams, you can explore these options:
1. Upload your own background: Both Zoom and MS Teams allow you to upload custom images as virtual backgrounds. This way, you can choose any image you like to personalize your virtual background.
2. Use video backgrounds: Some platforms, like Zoom, also allow you to use video backgrounds instead of static images. You can find various video backgrounds online that can add a dynamic and immersive element to your video calls.
3. Green screen backgrounds: If you have a green screen, you can use it with virtual background features to create professional-looking virtual backgrounds. These backgrounds effectively replace your actual background with any image or video you choose.
4. Third-party apps and websites: There are third-party apps and websites that offer additional virtual background options for Zoom and MS Teams. These apps and websites provide an extensive library of virtual backgrounds, ranging from landscapes to movie scenes, that you can use to enhance your video calls.
5. Brand-specific backgrounds: If you want to maintain consistency with your brand, you can create custom virtual backgrounds that feature your company logo or brand colors. This can help create a professional and branded appearance during virtual meetings.
Remember to check the specific features and requirements of your preferred video conferencing platform to ensure compatibility with the virtual backgrounds you choose to explore.
Conclusion
In the debate over whether to use a virtual background in Zoom or Teams, there are valid arguments on both sides. Virtual backgrounds can enhance professionalism and privacy, but they may also be distracting and lack authenticity.
When choosing a virtual background, it’s important to consider the purpose of the meeting and select an appropriate and non-distracting option. However, alternatives like using a physical backdrop or adjusting camera angles should also be considered.
The safe bet is something, clean and neutral so it is not distracting and professional.
Ultimately, the decision on whether to use a virtual background depends on the audience, personal preference, and the specific context of each meeting.
If you liked this article, remember to subscribe to miamicloud.com/. Connect. Learn. Innovate.